Using Supabase as an Auth Service
-
 Andriy Semenets
 - January 29, 2024
The goal of this article is to show how to use Supabase Auth with your own, self-hosted backend. While Supabase has many more features, we will focus on the Authorization and Authentication part only since it’s not very commonly known that you can use it with your own backend.
We will use Supabase Auth UI React component to handle all the authentication logic on the frontend, and we will build a custom backend to validate the JWT token and get the user email.
This article is not affiliated with Supabase. At DepsHub, we use Supabase for our own needs, and this article describes some of the ways to integrate their Auth solution into your custom backend (hosted outside of Supabase). You can use this technique to integrate Supabase Auth with virtually any backend service or hosting provider.
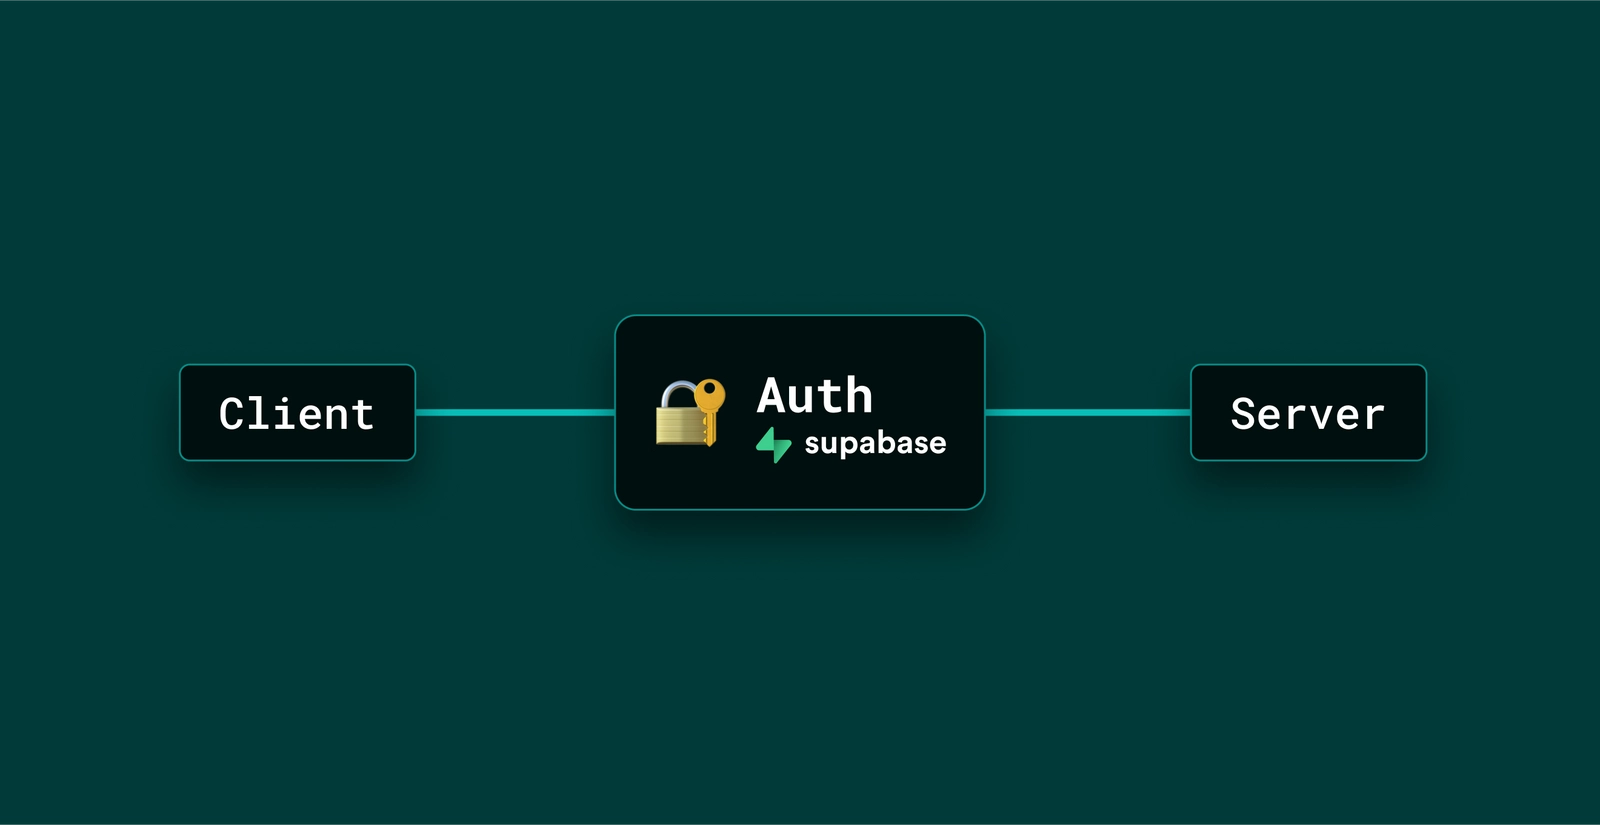
Before we begin, this is the demo of what we’re going to do today. Frontend is a very simple react app, with a Supabase Auth UI component. The backend is our custom Go lang server.
You should find all the source code the depshubhq/supabase-jwt-auth-demo repository. Let’s begin!
About Supabase Auth
Supabase is an open-source Firebase alternative. It comes built-in with tons of different features: Postgres database, Authentication, instant APIs, Edge Functions, Real-time subscriptions, Storage, and Vector embeddings. Today we will focus on a single Supabase feature: Supabase Auth.
Supabase Auth allows you to easily implement authentication and authorization systems for your app. One of the main features of Supabase Auth is that it uses the JSON Web Tokens (JWT) standard. That means you can easily integrate their Auth system with your custom backend even if you’re not planning to use all the other Supabase features.
It’s worth mentioning that there are a few similar solutions on the market that specifically offer authentication services: Auth0, Okta, Clerk, and many more. At DepsHub, we decided to use Supabase because of several reasons:
- Pricing: You can use Supabase Auth up to 50,000 MAU (Monthly Active Users) for free.
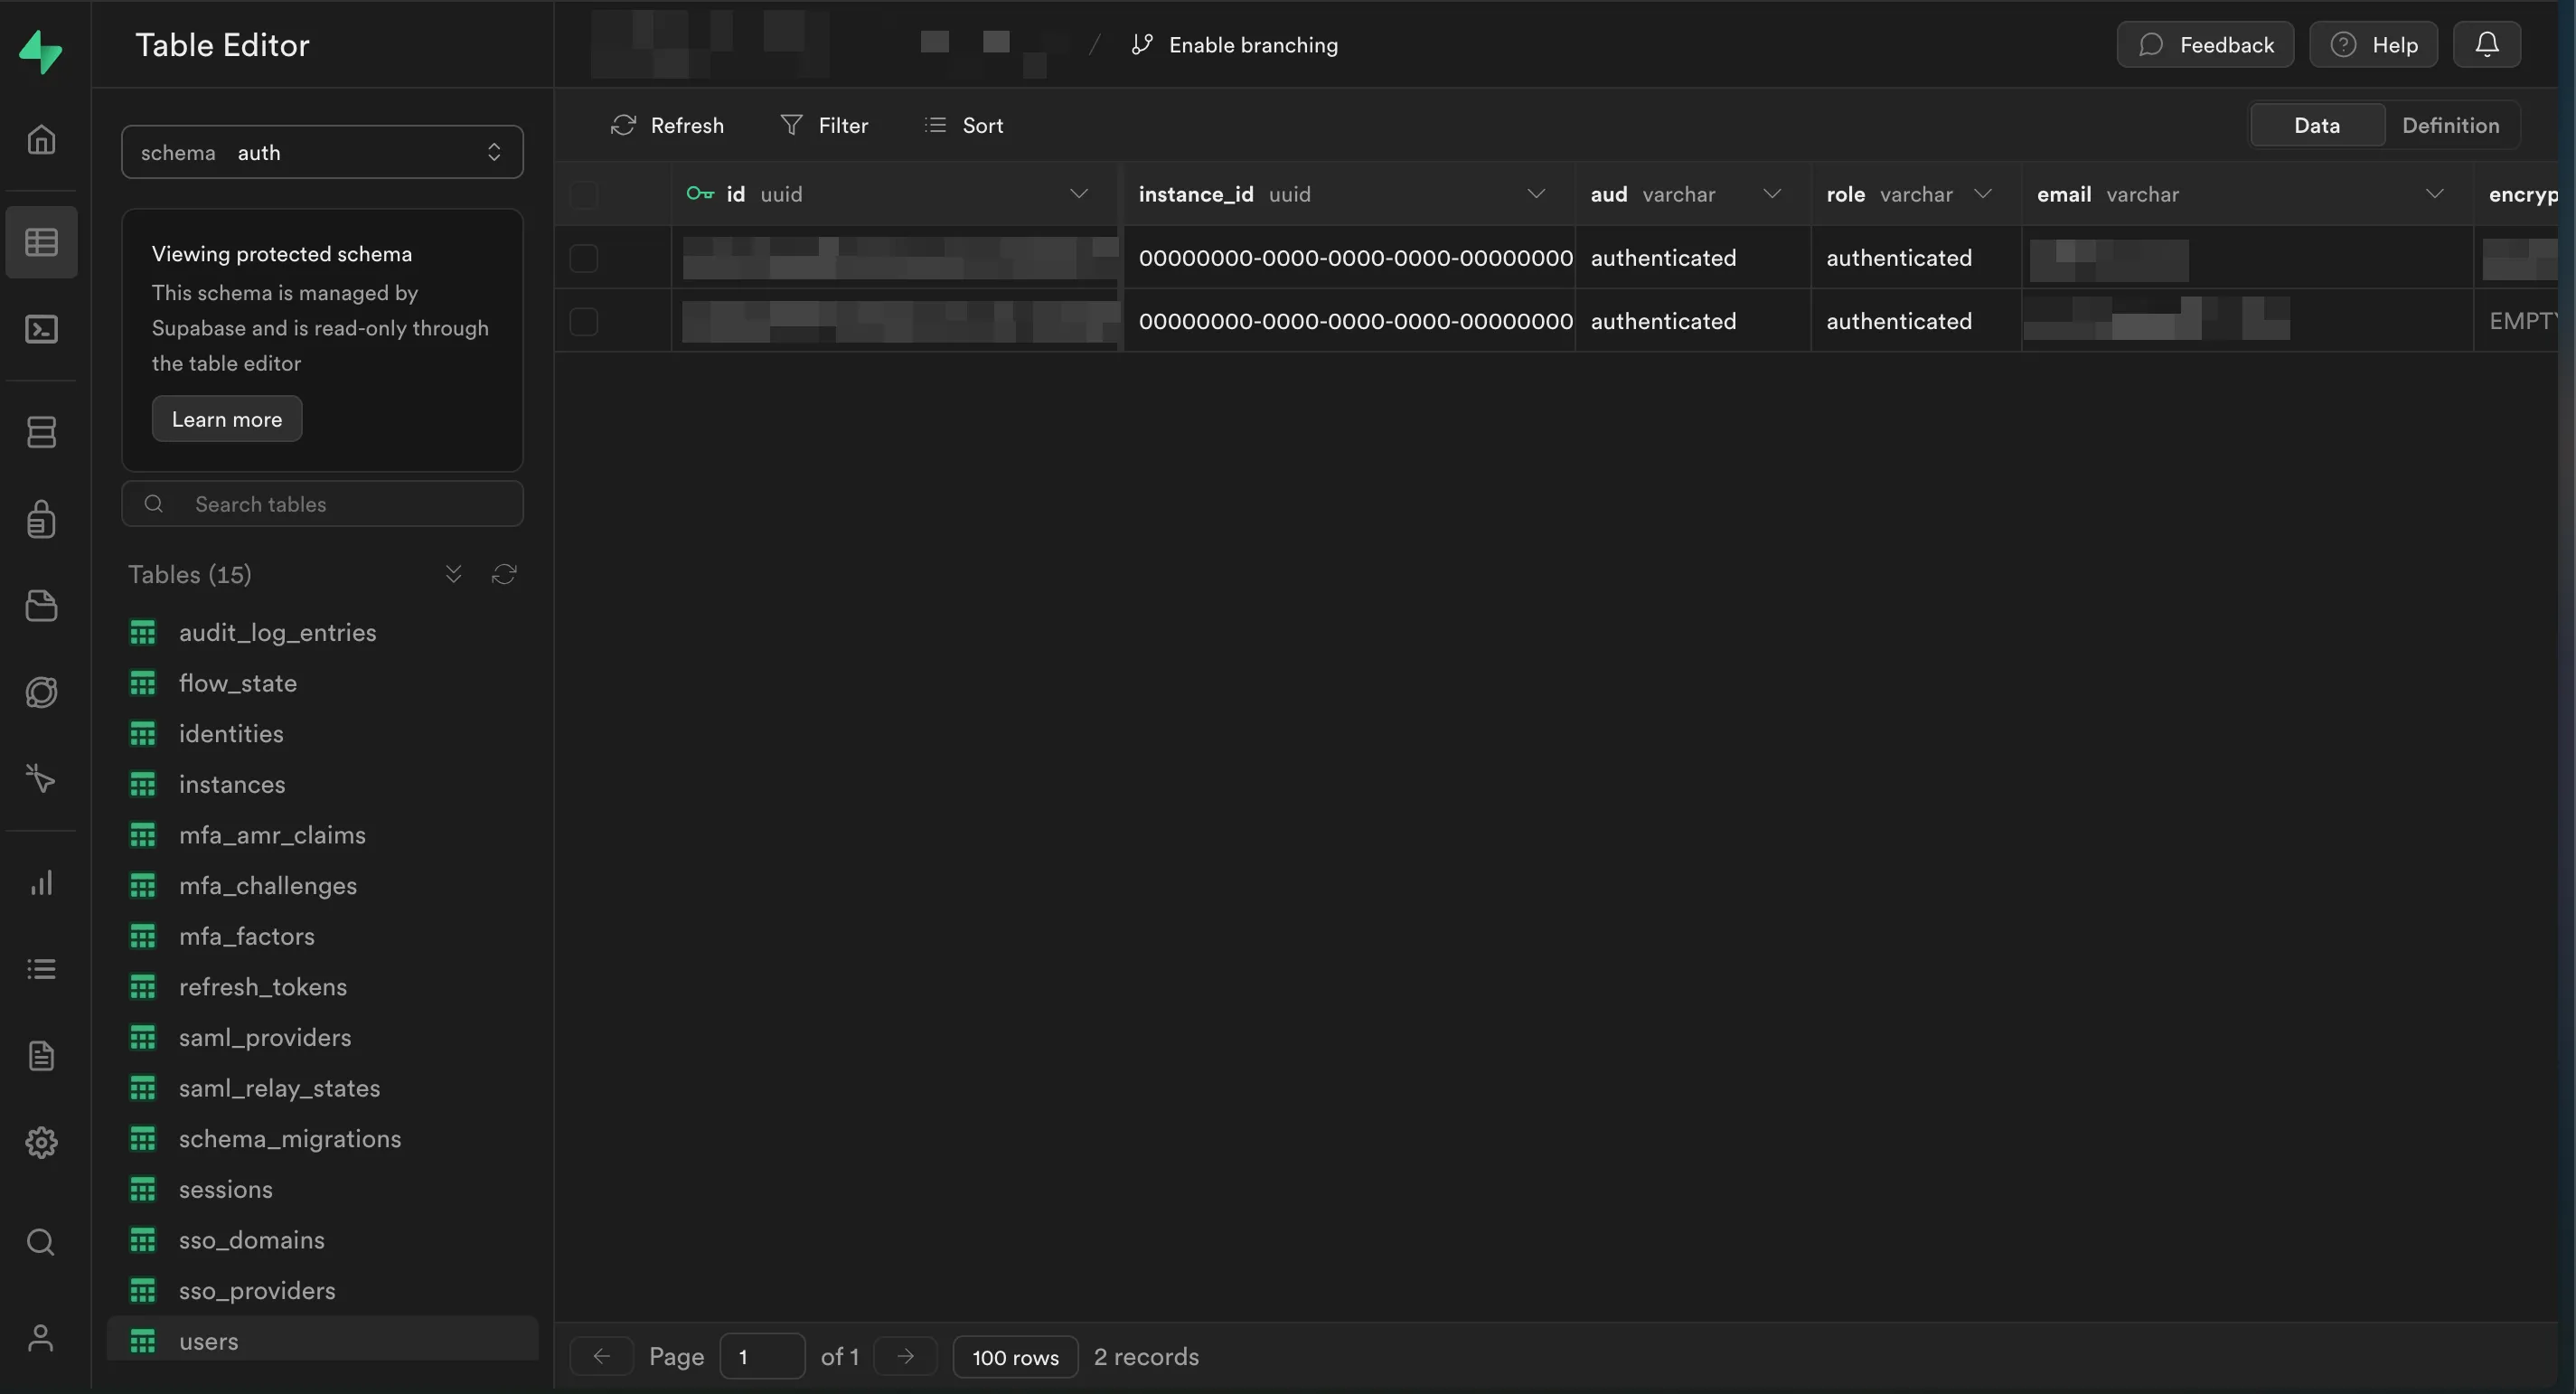
- Data Ownership: At its core, Supabase is a hosted PostgresQL database. All the accounts related data is saved in an
authtable that you can easily review, manipulate, or migrate to another service if needed. - Ease of use: Supabase has an amazing Supabase Auth UI React widget that allows you to integrate their auth system straight into your React app. It can be highly customized to your needs and has everything (Sign in, Sign up, Forgot my password, etc.) to get started in minutes.
It probably deserves a separate article on comparing the current state of the market for Auth providers, but taking into account all the reasons above and our current stage, we decided to go with Supabase.
Overview
Supabase uses JSON Web Tokens or JWT. You can find more detailed information (as well as some educational videos) on their website. If you’re not familiar with JWTs, I highly recommend checking it out first. In very basic terms, a JWT is essentially a simple JSON object that is encoded with a secret key (that you store on the backend). Supabase generates this JSON object (token) and sends it to you. You can use the secret key later on to check if the JSON object is a real valid token and whom it was signed for (their email or any other user-related data).
Architecture
Here is the general overview of our future implementation.
Loading graph...
As you can see, it’s pretty straightforward:
- You make the request to the Supabase Auth backend (using the Supabase Auth UI component) with the auth credentials or using one of the OAuth providers.
- Supabase returns a JWT token that you can store on your client (for example, in secured cookies).
- Use the JWT token to send subsequent requests to your custom backend (either as a cookie or using headers).
- Parse the JWT token, validate the user, and get any additional information about the request (user email, etc.).
Implementation
Setup
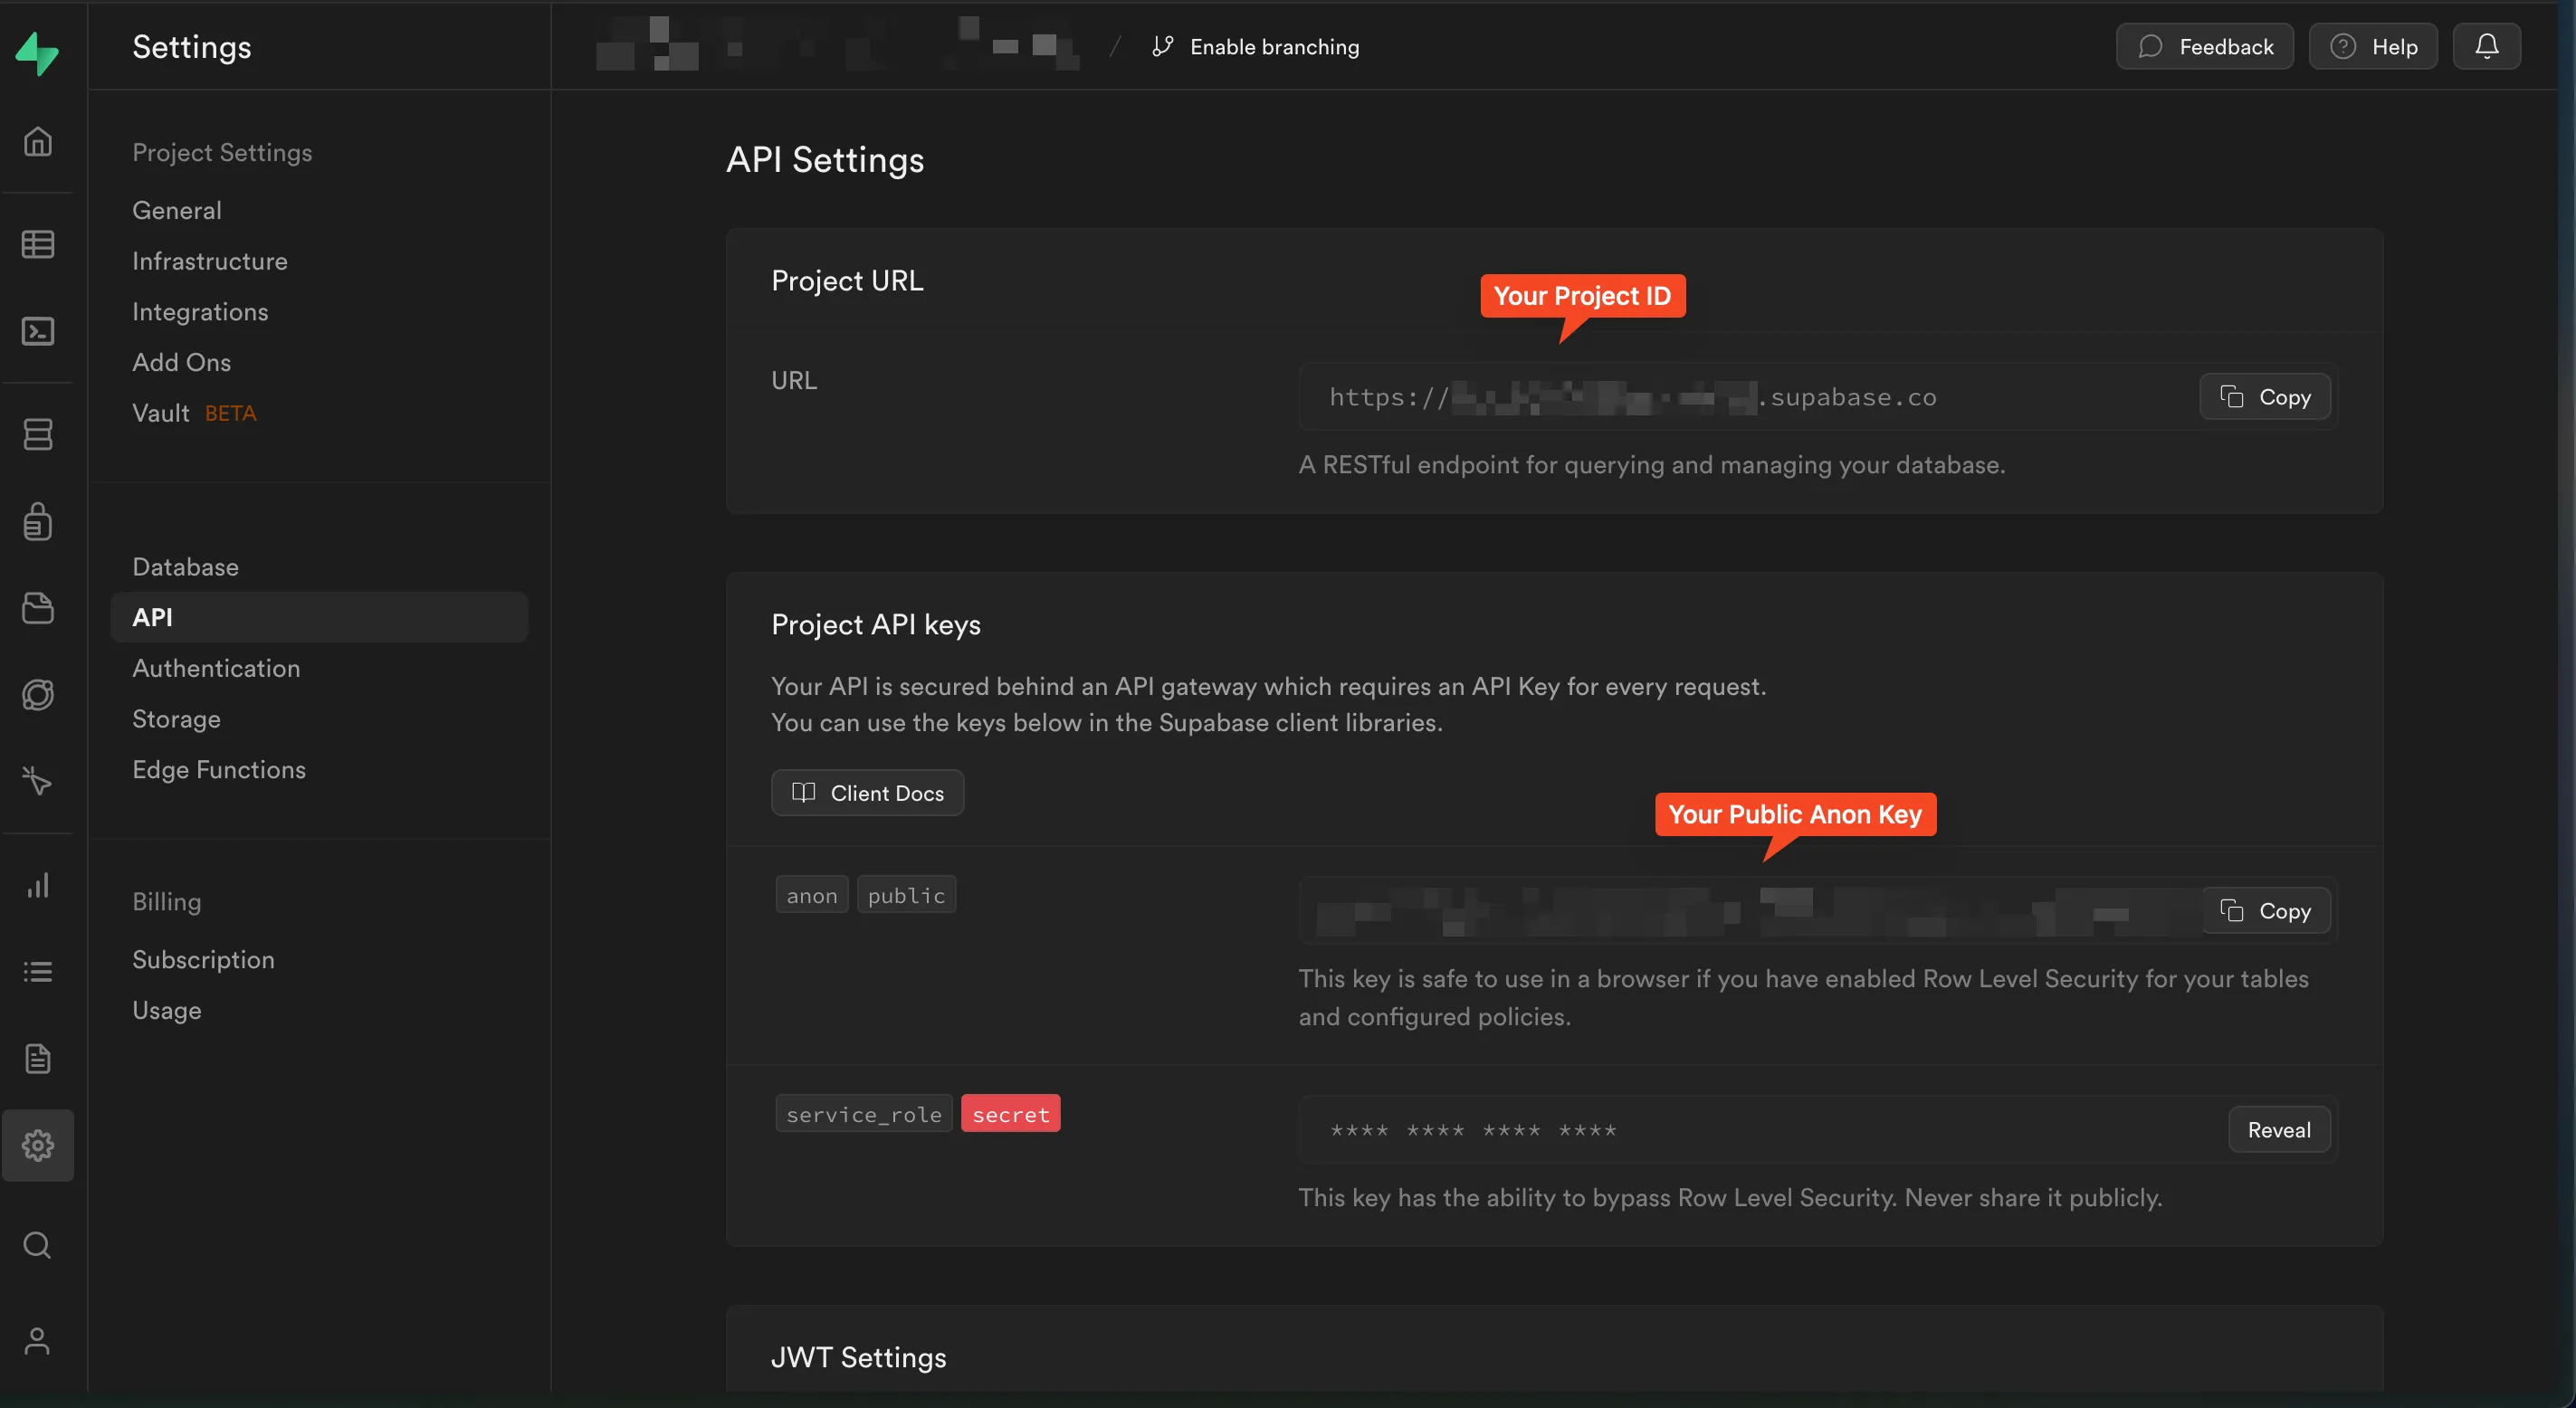
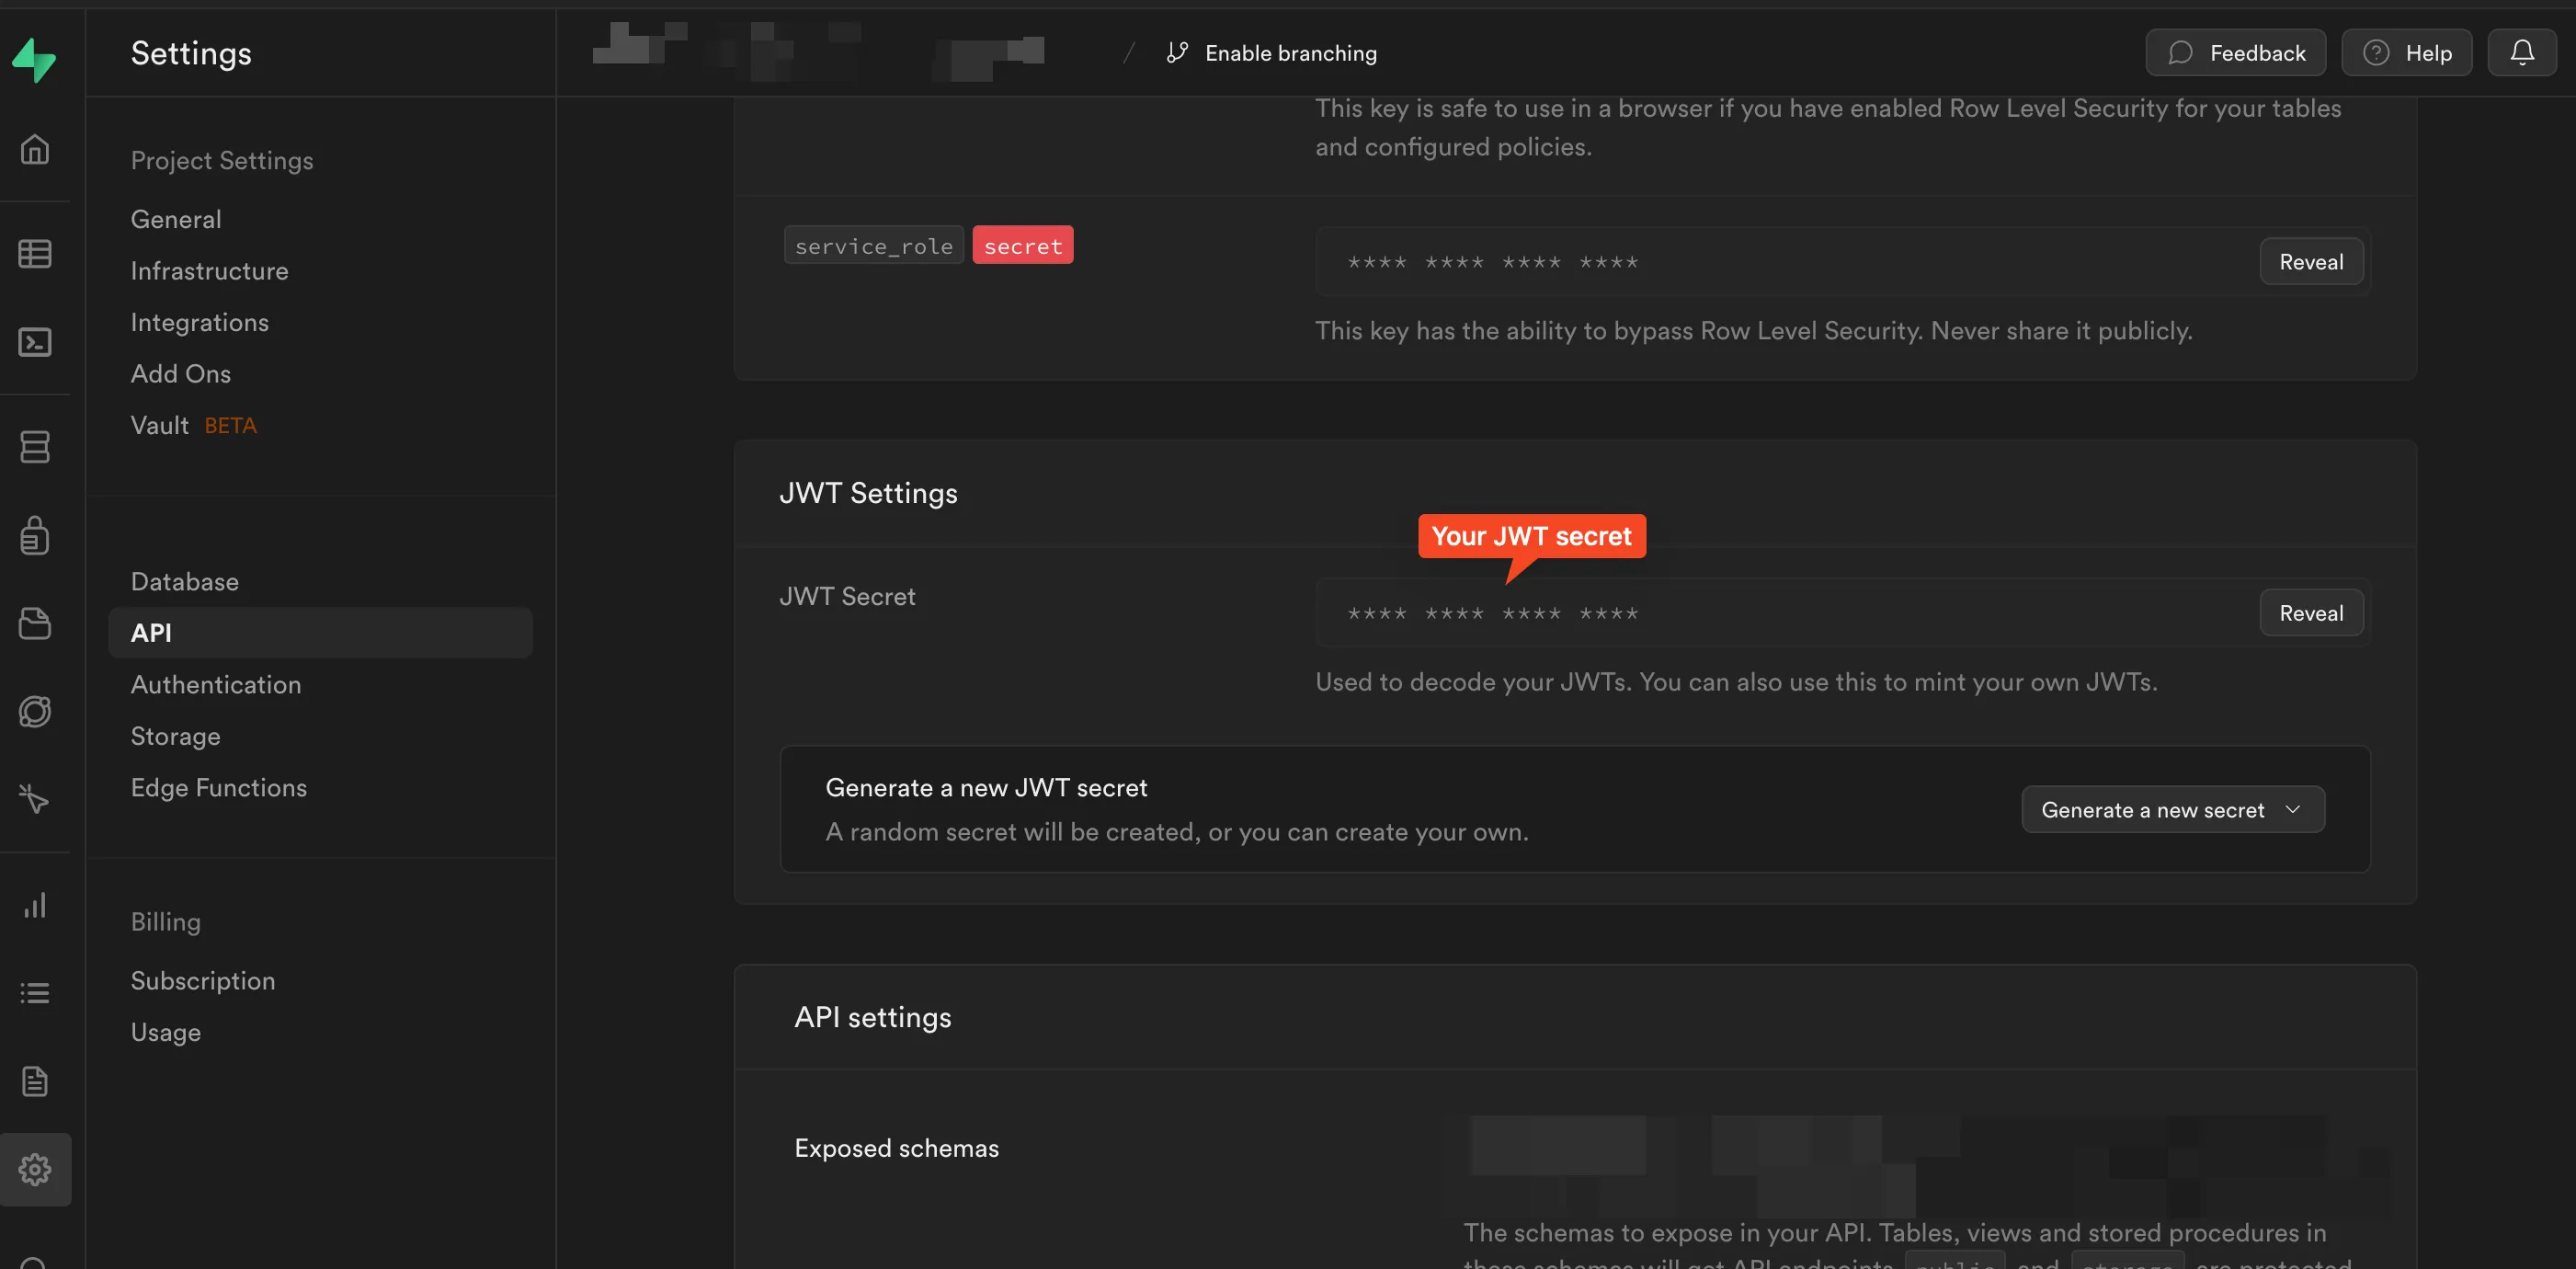
Before we begin, you will need SUPABASE_PROJECT_ID, SUPABASE_ANON_KEY, and SUPABASE_JWT_SECRET environment variables. The first two are needed for our client setup, and the latter is required for JWT token validation on the backend.
You can obtain all of these variables on your project settings page in Supabase:
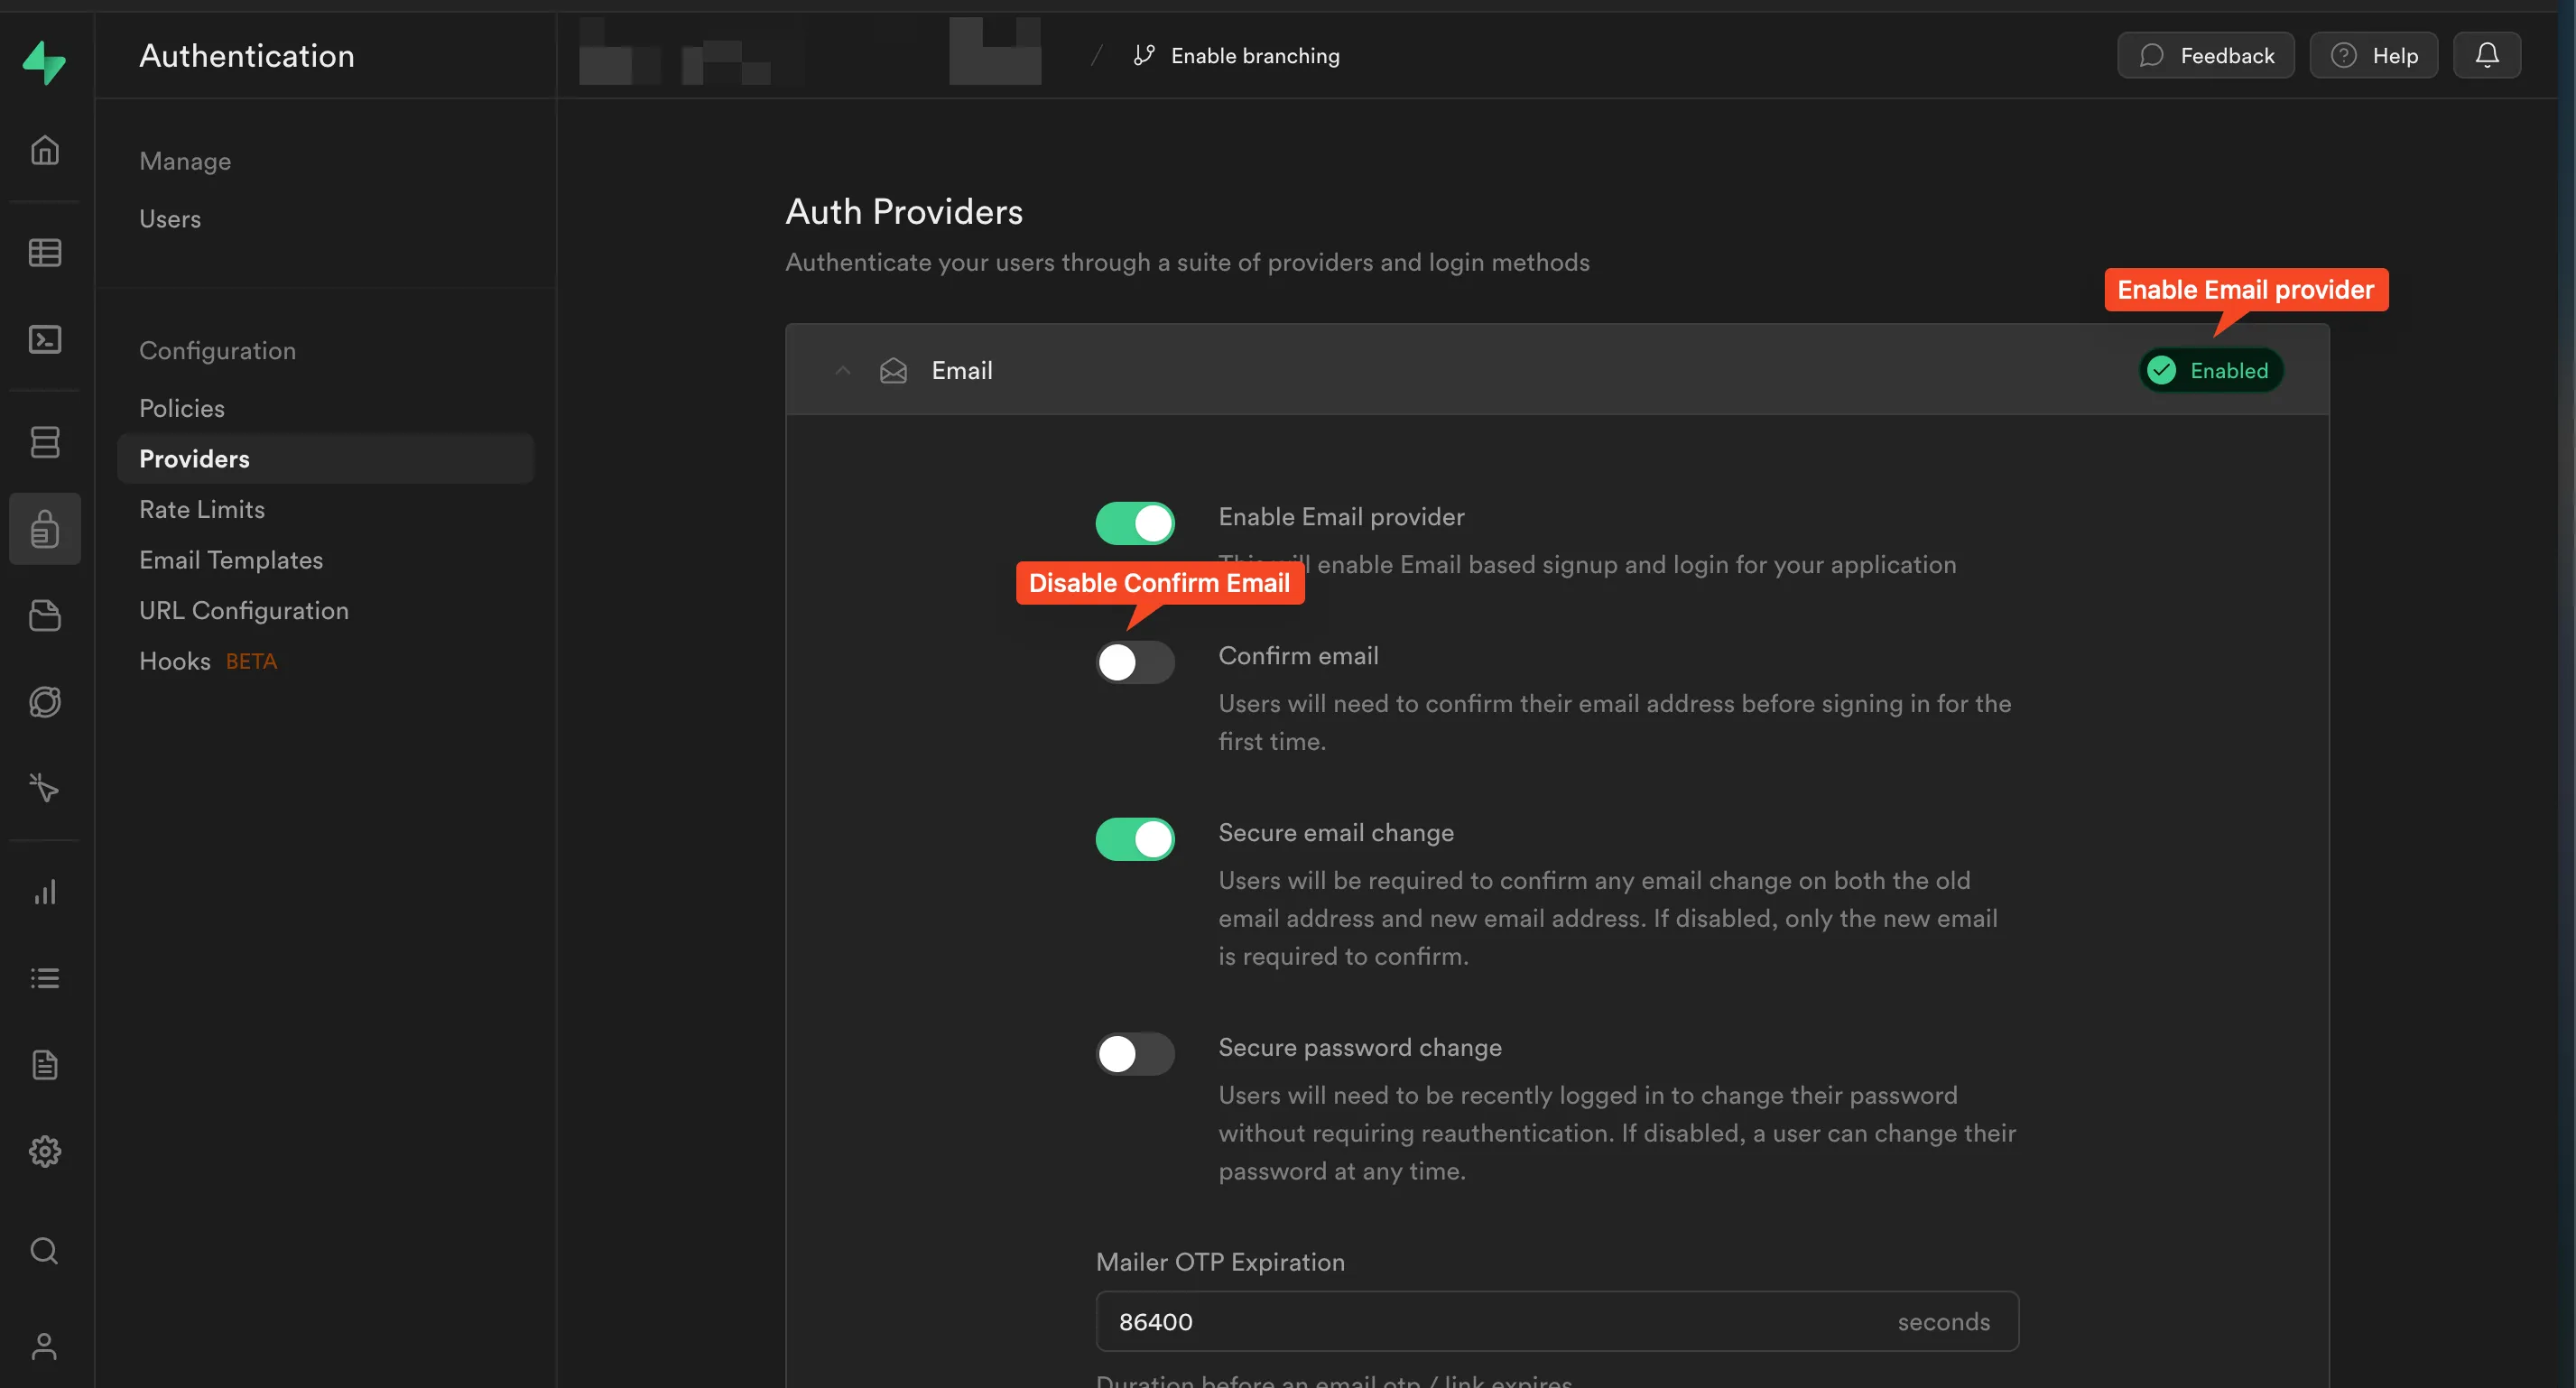
Also, to make your life easier (for testing purposes only), you can disable the Email confirmation checkbox in the Email provider settings.
Frontend
For this demo, we’re going to keep our frontend extremely simple with just a single file App.tsx. You can find the full source code here, so I will focus just on the main parts.
In order to work with Supabase Auth at its core, you just need a single library @supabase/supabase-js. Since we also use React, we’re also going to add @supabase/auth-ui-react and @supabase/auth-ui-shared to be able to work with their built-in UI Auth kit.
First, we need to create a Supabase client. You can do it by using the createClient function.
import { Auth } from "@supabase/auth-ui-react";
import { User, createClient } from "@supabase/supabase-js";

const supabaseProjectId = import.meta.env.VITE_SUPABASE_PROJECT_ID;
const supabaseUrl = `https://${supabaseProjectId}.supabase.co`;
const publicAnonKey = import.meta.env.VITE_SUPABASE_ANON_KEY;

const supabase = createClient(supabaseUrl, publicAnonKey);
Notice the import.meta.env.* variables here. You need to specify your SUPABASE_PROJECT_ID and SUPABASE_ANON_KEY. We use Vite to build our project, and it uses import.meta.env.* syntax to access the environment variables. You can find more information about Vite environment variables here. Alternatively, refer to the repository README on how to do that.
The next step is to add our main component that is going to render either LoggedIn or LoggedOut child components depending on the current state.
function App() {
  // Contains the user received from Supabase
  const [user, setUser] = useState<User>();

  useEffect(() => {
    // Whenever the auth state changes, we receive an event and a session object.
    // Save the user from the session object to the state.
    supabase.auth.onAuthStateChange((event, session) => {
      if (event === "SIGNED_IN") {
        setUser(session?.user);
      }
    });
  }, []);

  return user ? <LoggedIn /> : <LoggedOut />;
}
Then, let’s add a new LoggedOut component, since it’s the easiest one (thanks to Supabase!).
import { Auth } from "@supabase/auth-ui-react";
import { ThemeSupa } from "@supabase/auth-ui-shared";

// our previous code here

function LoggedOut() {
  return (
    <Auth
      supabaseClient={supabase}
      appearance={{
        theme: ThemeSupa,
      }}
      providers={[]}
      theme="dark"
      redirectTo="/"
      showLinks
    />
  );
}
And the last missing piece is the LoggedIn component:
function LoggedIn() {
  // Store data that we get from the backend
  const [ourSecretData, setOutSecretData] = useState();

  // Perform a request to the backend (with a protected route) to get the secret data
  useEffect(() => {
    fetch("http://localhost:3000/secret", {
      method: "POST",
      headers: {
        // This is the token that we get from Supabase.
        Authorization: getToken(),
      },
    })
      .then((res) => res.json())
      .then((data) => setOutSecretData(data));
  }, []);

  // This removes the token from local storage and reloads the page
  const handleSignOut = () => {
    supabase.auth.signOut().then(() => {
      window.location.reload();
    });
  };

  return (
    <>
      <div>{JSON.stringify(ourSecretData)}</div>
      <button onClick={handleSignOut}>Sign out</button>
    </>
  );
}

// This function gets the token from local storage.
// Supabase stores the token in local storage so we can access it from there.
const getToken = () => {
  const storageKey = `sb-${supabaseProjectId}-auth-token`;
  const sessionDataString = localStorage.getItem(storageKey);
  const sessionData = JSON.parse(sessionDataString || "null");
  const token = sessionData?.access_token;

  return token;
};

export default App;
And that’s it for our frontend! You can find the entire file here.
Backend
As I mentioned before, this solution will work with any language and/or framework. In this example, we’re going to use Go. I added a bunch of comments for people who’re not familiar with Go (on a side note, you should definitely try it out, it’s great!) so it should be pretty simple to follow.
package main

import (
    "context"
    "fmt"
    "log"
    "net/http"
    "os"

    "github.com/gin-contrib/cors"
    "github.com/gin-gonic/gin"
    "github.com/golang-jwt/jwt/v5"
)

func main() {
    // Get the secret from the environment
    hmacSecret := os.Getenv("SUPABASE_JWT_SECRET")

    // Prevent the server from starting if the secret is not set
    if hmacSecret == "" {
        log.Fatal("Please set the SUPABASE_JWT_SECRET environment variable")
    }

    // Create a new router
    router := gin.New()

    // Enable CORS for all origins. This is not recommended for production usage.
    // Use a whitelist of allowed origins instead.
    corsConfig := cors.Config{
        AllowOrigins: []string{"*"},
        AllowHeaders: []string{"Origin", "Content-Length", "Content-Type", "Authorization"},
    }

    router.Use(cors.New(corsConfig))

    // The only route we have is /secret and it is protected by the authMiddleware.
    router.POST("/secret", authMiddleware(hmacSecret), secretRouteHandler())

    // Run the server
    if err := router.Run(":3000"); err != nil {
        log.Fatal(err)
    }
}

var emailCtxKey = "email"

func authMiddleware(hmacSecret string) gin.HandlerFunc {
    return func(c *gin.Context) {
        // Read the Authorization header
        token := c.GetHeader("Authorization")
        if token == "" {
            c.AbortWithStatusJSON(http.StatusUnauthorized, gin.H{"error": "Unauthorized"})
            return
        }

        // Validate token
        // convert strign to a byte array
        email, err := parseJWTToken(token, []byte(hmacSecret))

        if err != nil {
            log.Printf("Error parsing token: %s", err)
            c.AbortWithStatusJSON(http.StatusUnauthorized, gin.H{"error": "Unauthorized"})
            return
        }

        log.Printf("Received request from %s", email)

        // Save the email in the context to use later in the handler
        ctx := context.WithValue(c, emailCtxKey, email)
        c.Request = c.Request.WithContext(ctx)

        // Authenticated. Continue (call next handler)
        c.Next()
    }
}

func secretRouteHandler() gin.HandlerFunc {
    return func(c *gin.Context) {
        // Get the email from the context
        email := c.GetString(emailCtxKey)

        // Return the secret message
        c.JSON(200, gin.H{
            "message": "our hidden value for the user " + email,
        })
    }
}

// List of claims that we want to parse from the JWT token.
// The RegisteredClaims struct contains the standard claims.
// See https://pkg.go.dev/github.com/golang-jwt/jwt/v5#RegisteredClaims
type Claims struct {
    Email string `json:"email"`
    jwt.RegisteredClaims
}

// This function parses the JWT token and returns the email claim
func parseJWTToken(token string, hmacSecret []byte) (email string, err error) {
    // Parse the token and validate the signature
    t, err := jwt.ParseWithClaims(token, &Claims{}, func(token *jwt.Token) (interface{}, error) {
        if _, ok := token.Method.(*jwt.SigningMethodHMAC); !ok {
            return nil, fmt.Errorf("unexpected signing method: %v", token.Header["alg"])
        }
        return hmacSecret, nil
    })

    // Check if the token is valid
    if err != nil {
        return "", fmt.Errorf("error validating token: %v", err)
    } else if claims, ok := t.Claims.(*Claims); ok {
        return claims.Email, nil
    }

    return "", fmt.Errorf("error parsing token: %v", err)
}
At its core, we have two main things here secretRouteHandler and authMiddleware:
authMiddlewarefunction is called for every request. It receives the token from the headers, parses it, and validates using ourSUPABASE_JWT_SECRETthat we saved before.secretRouteHandlergets the email from the context and returns the response to the client.
It’s worth mentioning that you could also issue tokens manually on your backend (as well as a bunch of other things). If you’re curious to know more, or you need granular control over your user sessions, you can check Supabase Auth API. It allows you to control user sessions and manage users directly from your backend.
And that’s everything we need for our backend! You can simply run it with the go run . command, and you should have your server running.
Bonus Point - User Management
Supabase provides a nice “admin panel” for anything user-related. You can view all the signed-up users, their last visits, add a new user, etc.
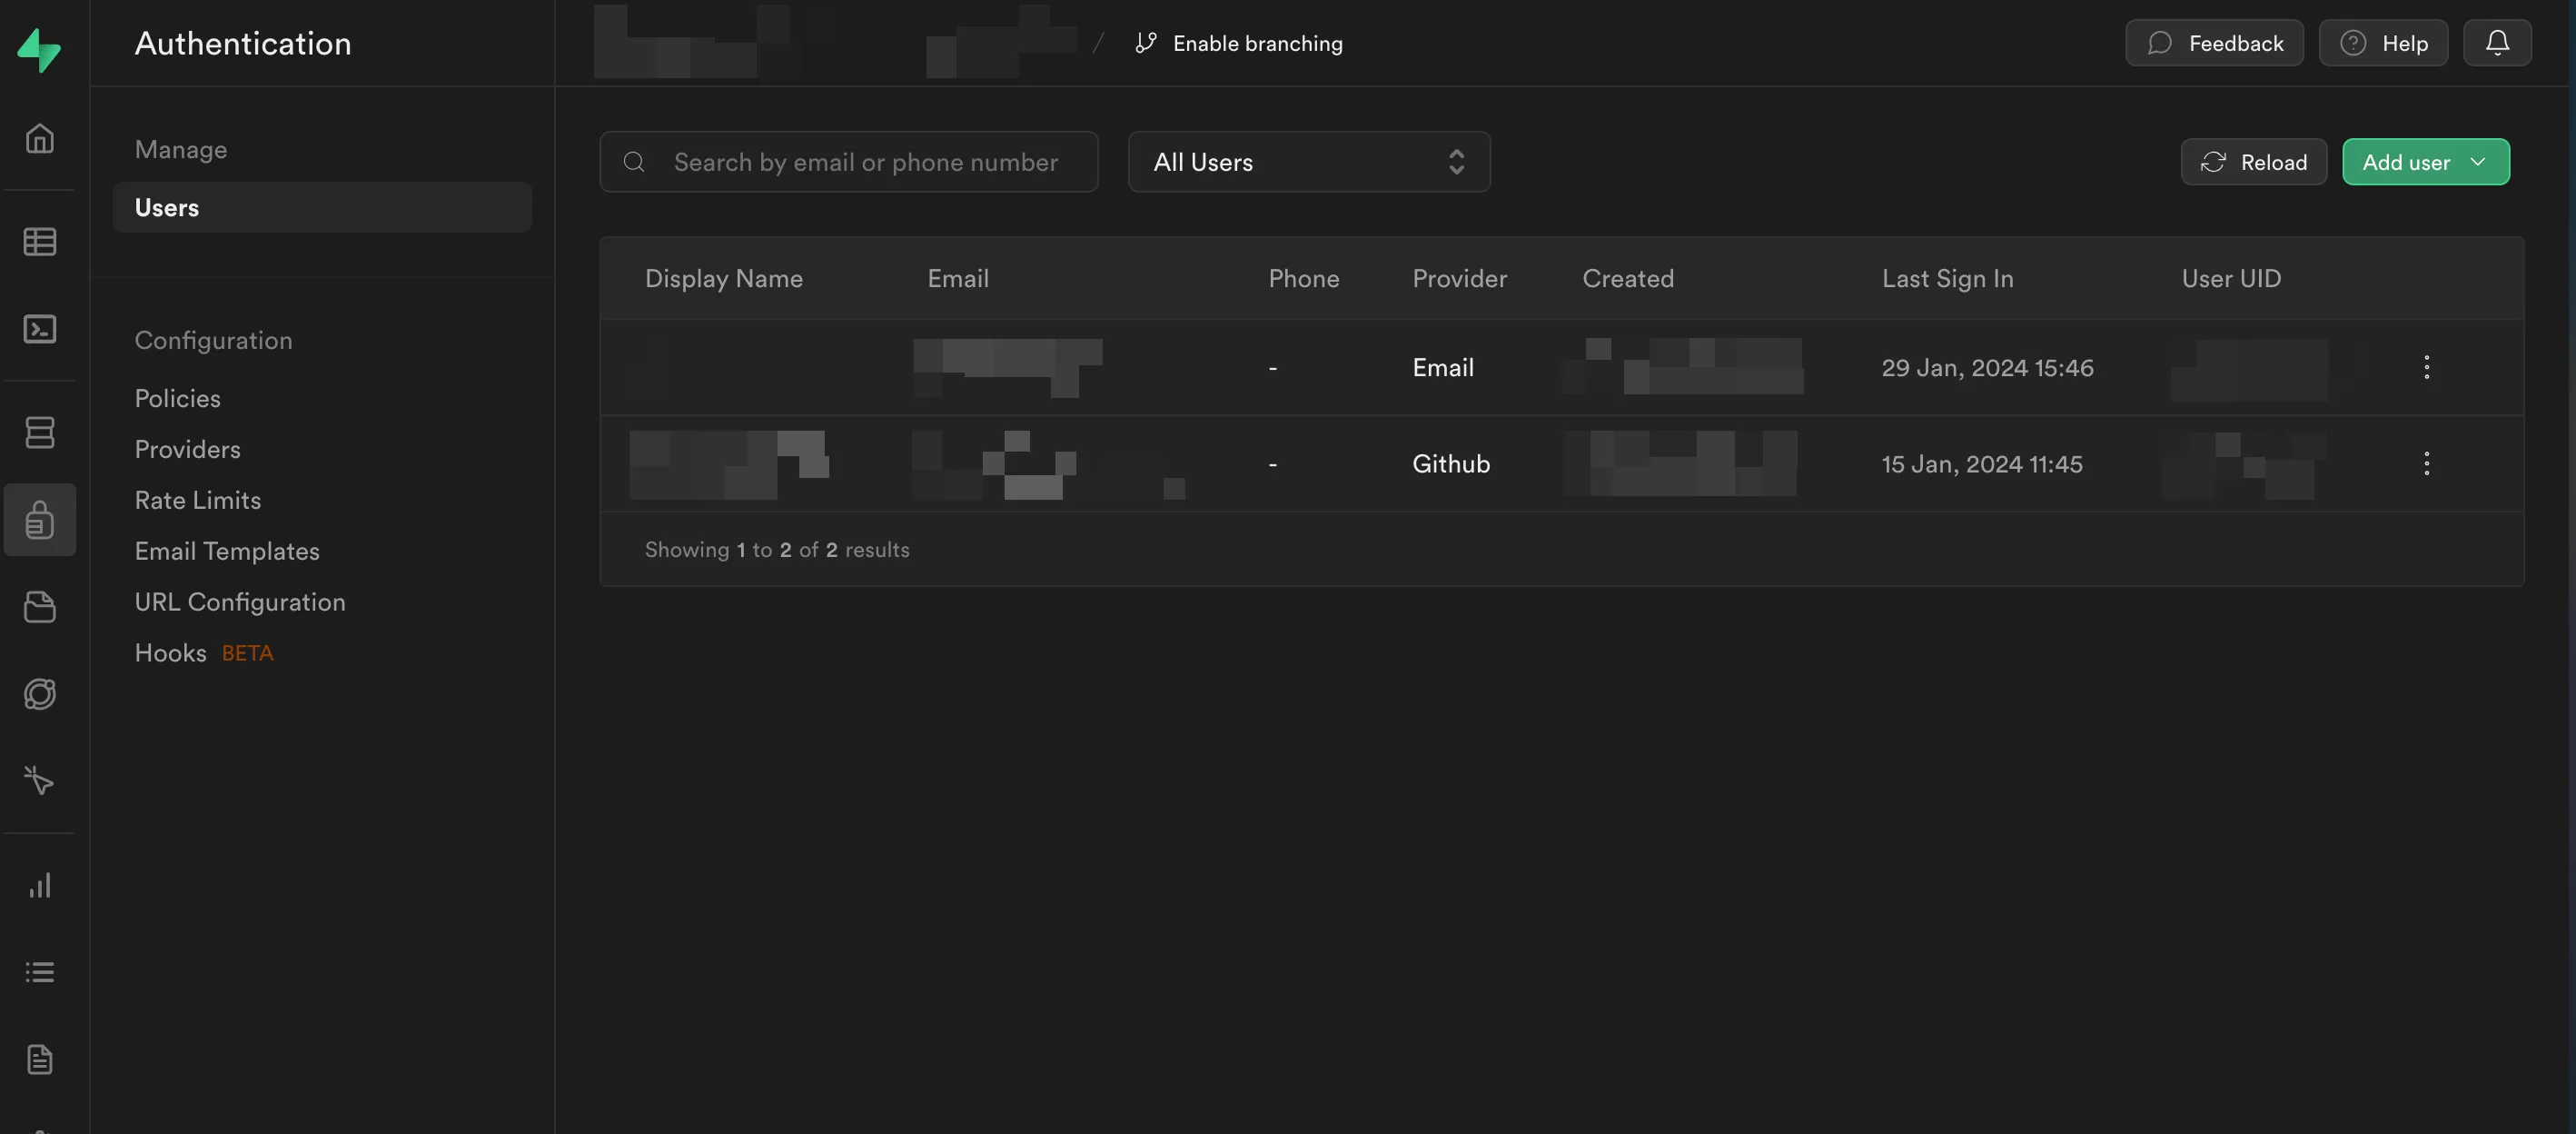
But the best part is that all user-related data belongs to us! Since Supabase uses PostgresQL under the hood, you can view/export any tables you want at any time.
Conclusions
While this may change in the future, right now, Supabase is a perfect choice for any early-stage startup that is just starting to build their product. Most of the Auth platforms today are pretty much migration-unfriendly - once you started using them, it’s hard/impossible to migrate to something else. Supabase allows you to even self-host their auth solution!
And since users are the most valuable thing for any startup, you should make wise choices from the beginning.


 Twitter
 Discord